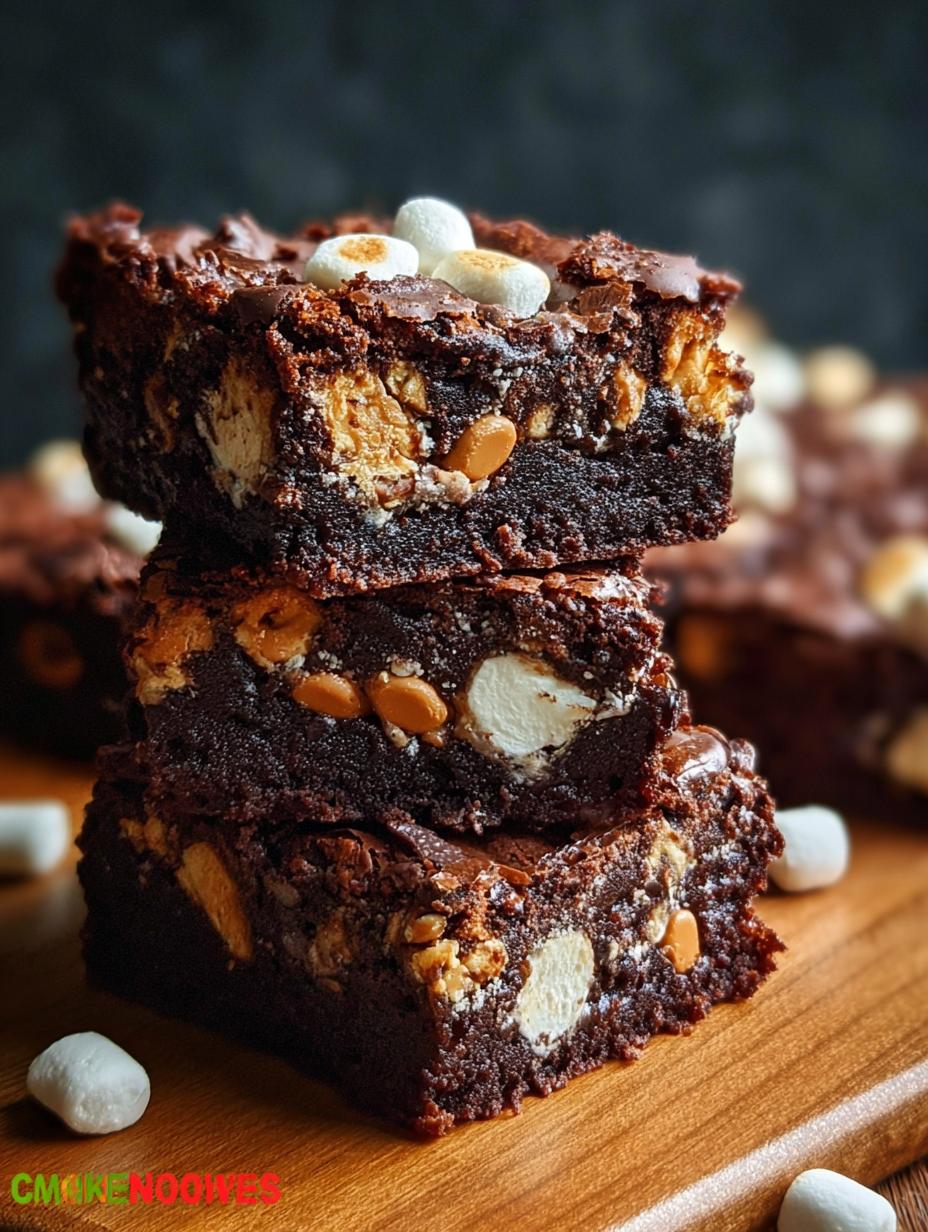
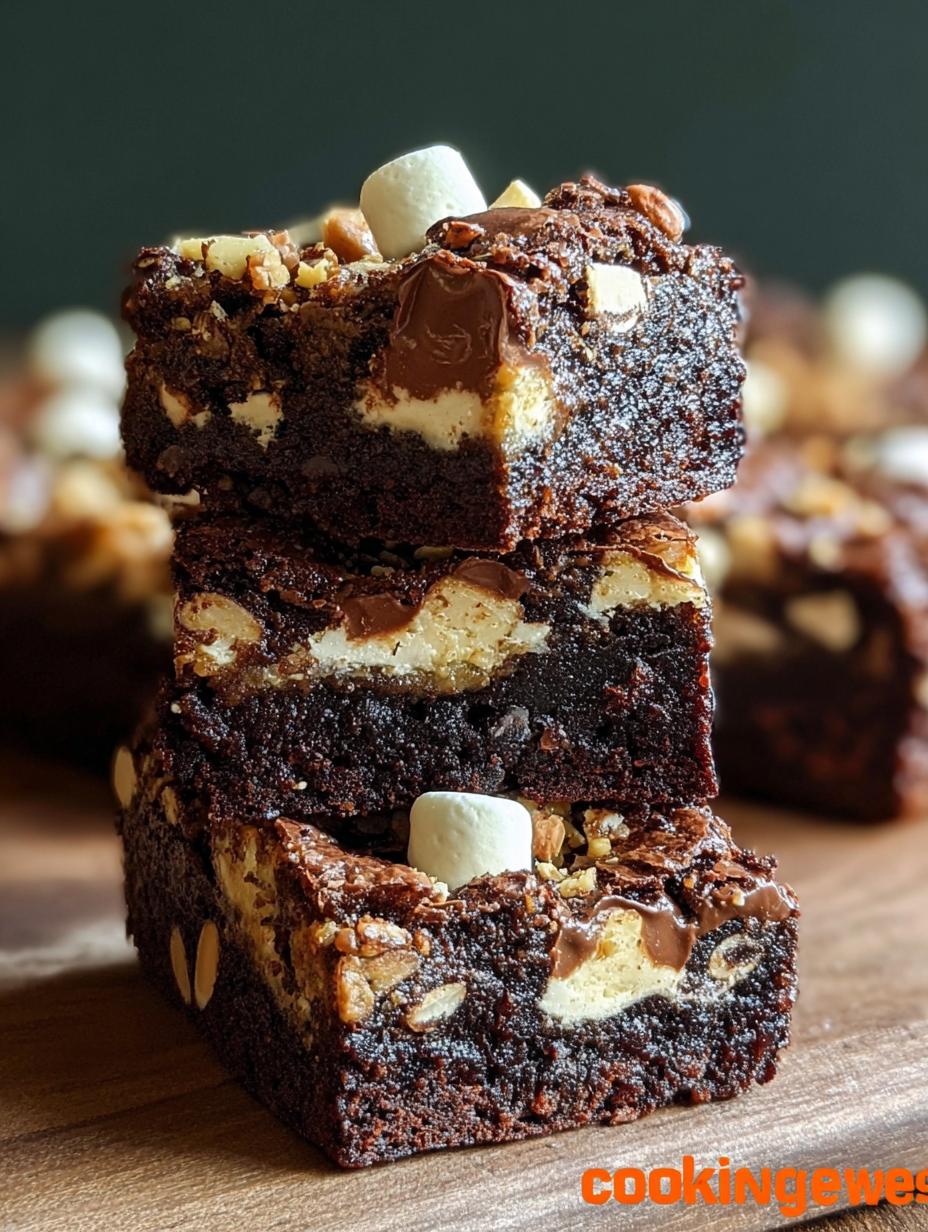
Rocky Road Brownies has been my go-to comfort dessert ever since I was a kid. I remember my grandma pulling a warm pan of these out of the oven, the smell of rich chocolate and toasted marshmallows filling her kitchen. There’s something so incredibly nostalgic about the way the fudgy brownie base, gooey marshmallows, and crunchy nuts all come together. It’s like a hug in dessert form! This recipe for Rocky Road Fudge Brownies isn’t just easy; it’s a taste of pure joy that will instantly transport you back to simpler times. You’ll love how simple it is to whip up this ultimate chocolate treat, making it a perfect quick dessert for any occasion. Let’s get cooking!
Why You’ll Love These Rocky Road Brownies
I know you’re going to fall head over heels for this particular Rocky Road Brownies recipe. It’s truly a game-changer for anyone who loves a good dessert.
- Irresistible Taste: Every bite delivers a symphony of rich chocolate, gooey marshmallow, and crunchy walnuts. It’s pure dessert bliss!
- Quick & Easy: This isn’t just any brownie recipe; it’s an Easy Rocky Road Brownies recipe that comes together with minimal fuss.
- Crowd-Pleaser: Everyone, from kids to adults, adores these brownies, making them perfect for gatherings.
- Budget-Friendly: Made with common pantry staples, this recipe is kind to your wallet.
- Satisfies Cravings: When you need a serious chocolate fix, these hit the spot perfectly.
- The Best Rocky Road Brownies recipe: I genuinely believe this is the Best Rocky Road Brownies recipe you’ll ever try, balancing fudginess and texture flawlessly.
Ingredients for Homemade Rocky Road Brownies
Gathering your ingredients is the first step to creating these incredible treats. I’ve found that using quality ingredients really makes a difference in the final taste of your Rocky Road Brownies.
- 1 cup unsalted butter – melted, this forms the rich base.
- 1 cup granulated sugar – for sweetness and that signature crackly top.
- 1/2 cup brown sugar – adds moisture and a hint of caramel flavor to our fudgy brownies.
- 3 large eggs – ideally at room temperature, for better emulsification.
- 1 teaspoon vanilla extract – enhances all the chocolatey goodness.
- 3/4 cup all-purpose flour – don’t overmix to keep them tender.
- 1/2 cup unsweetened cocoa powder – provides deep chocolate flavor.
- 1/2 teaspoon salt – balances the sweetness.
- 1/2 teaspoon baking powder – helps with a slight lift and chewiness.
- 1 cup semi-sweet chocolate chips – for extra pockets of melted chocolate throughout.
- 1 1/2 cups mini marshmallows – these melt into gooey pockets, making them true Chocolate marshmallow nut brownies.
- 3/4 cup chopped walnuts (or pecans) – for that essential Rocky Road crunch!

How to Make Rocky Road Brownies
Making these decadent Rocky Road Brownies is a straightforward process, and I promise you’ll love every step. Just follow these simple instructions to achieve perfectly fudgy, gooey, and crunchy brownies that will impress everyone.
- Step 1: First things first, preheat your oven to 350°F (175°C). While it’s heating, line a 9×13 inch baking pan with parchment paper, leaving an overhang on the sides. This makes lifting the cooled brownies out incredibly easy later on.
- Step 2: In a medium saucepan, melt the 1 cup unsalted butter over low heat. Once fully melted, whisk in the 1 cup granulated sugar and 1/2 cup brown sugar until the mixture is smooth and glossy. I always let this cool for a few minutes; it prevents the eggs from scrambling.
- Step 3: Once slightly cooled, add the 3 large eggs one at a time, whisking well after each addition until fully incorporated. Stir in the 1 teaspoon vanilla extract, lending a beautiful aroma to the batter.
- Step 4: In a separate bowl, combine the dry ingredients: 3/4 cup all-purpose flour, 1/2 cup unsweetened cocoa powder, 1/2 teaspoon salt, and 1/2 teaspoon baking powder. Whisk them together to ensure everything is evenly distributed.
- Step 5: Gradually add the dry ingredient mixture to the wet ingredients, stirring gently with a spatula until just combined. Be careful not to overmix here; overmixing can lead to tough brownies. This is key to knowing how to make Rocky Road Brownies perfectly.
- Step 6: Fold in most of the 1 cup semi-sweet chocolate chips and 3/4 cup chopped walnuts. Reserve a small handful of each for sprinkling on top. Gently fold in 1 1/2 cups mini marshmallows last, being careful not to crush them too much.
- Step 7: Pour the rich brownie batter into your prepared pan and spread it evenly. Sprinkle the remaining chocolate chips and walnuts over the top. This adds a lovely visual appeal and extra crunch to your finished Rocky Road Brownies.
- Step 8: Bake for 30–35 minutes, or until a toothpick inserted into the center comes out with moist crumbs, not wet batter. Remember, a slightly underbaked brownie is a fudgier brownie!
- Step 9: Allow the brownies to cool completely in the pan on a wire rack before attempting to lift and slice them. This patience is crucial for neat squares and truly fudgy results. Now you know how to make Rocky Road Brownies that are both delicious and easy to handle!
Pro Tips for the Best Chewy Rocky Road Brownies
I’ve baked countless batches of these brownies, and I’ve picked up a few tricks along the way. These expert tips will help you achieve the most delicious and chewy Rocky Road Brownies every single time, ensuring they’re a huge hit with anyone who tries them.
- Always use good quality cocoa powder and chocolate chips; it truly elevates the flavor.
- Don’t overmix the batter once you add the dry ingredients – just mix until barely combined. This is crucial for a fudgy texture.
- For an extra layer of flavor and texture, lightly toast your walnuts before adding them to the batter.
- Press down any marshmallows that pop up during baking to encourage that gooey, melted effect.
- Let your brownies cool completely. I know it’s hard to wait, but this ensures clean slices and a perfect set.
What’s the secret to perfect Gooey Rocky Road Brownies?
The real secret to achieving truly gooey Rocky Road Brownies lies in slightly underbaking them and adding the marshmallows towards the end. This ensures the marshmallows melt into pockets of sticky sweetness without completely disappearing. It’s the key to that irresistible fudgy brownies with rocky road topping texture.
Can I make Rocky Road Brownies ahead of time?
Absolutely! These brownies are fantastic for meal prep. You can bake them a day or two in advance. Store them in an airtight container at room temperature. They actually get even fudgier and more flavorful on the second day, making them perfect for parties.
How do I avoid common mistakes with Rocky Road Brownies?
To avoid common pitfalls, don’t overbake them; a toothpick should come out with moist crumbs, not completely clean. Also, make sure your butter and sugar mixture cools slightly before adding eggs to prevent scrambling. Lastly, resist the urge to cut them before they’ve fully cooled, or you’ll end up with messy edges.
Best Ways to Serve Rocky Road Brownies
Once your irresistible Rocky Road Brownies have cooled and are ready to be devoured, you might be wondering how best to serve them. I love them just as they are, a perfect handheld treat, but sometimes it’s fun to elevate the experience. These brownies are incredibly versatile and can be transformed into a decadent dessert bar experience with just a few additions.
For a truly indulgent treat, serve a warm square of Rocky Road Brownies with a scoop of vanilla bean ice cream. The contrast between the warm brownie and cold ice cream, plus the melting marshmallows, is pure bliss. A drizzle of hot fudge sauce or caramel takes it to the next level. You could also crumble them into a parfait with whipped cream and fresh berries for a layered dessert. These also make fantastic Rocky Road dessert bars when cut into smaller squares and arranged on a platter for a party, perhaps alongside some fresh coffee or a glass of cold milk.
Nutrition Facts for Rocky Road Brownies
I know many of you like to keep an eye on what you’re eating, so I’ve put together the estimated nutritional information for these delicious Rocky Road Brownies. Please remember that these values are based on the ingredients and quantities I’ve used, and can vary slightly depending on your specific brands and any substitutions you might make.
- Serving Size: 1 brownie
- Calories: 280
- Fat: 14g
- Saturated Fat: 7g
- Carbohydrates: 36g
- Fiber: 2g
- Sugar: 24g
- Protein: 3g
- Sodium: 110mg
Nutritional values are estimates and may vary based on specific ingredients used.
How to Store and Reheat Rocky Road Brownies
Once you’ve made a batch of this simple Rocky Road brownie recipe, you might find yourself with a few leftovers – a rare but happy occasion! Proper storage is key to keeping your brownies fresh and fudgy. I always recommend letting them cool completely in the pan before attempting to cut or store them. This prevents them from drying out and helps maintain their perfect texture.
For short-term storage, place your Rocky Road Brownies in an airtight container at room temperature for up to 3-4 days. If you want them to last longer, you can store them in the refrigerator for up to a week. For freezing, wrap individual brownies tightly in plastic wrap, then place them in a freezer-safe bag or container. They’ll stay fresh for up to 3 months.
When you’re ready to enjoy a frozen brownie, simply let it thaw at room temperature for about an hour. If you prefer them warm, a quick zap in the microwave for 15-20 seconds will bring back that gooey, fresh-baked feel. It’s like having a freshly baked dessert on demand!
Frequently Asked Questions About Rocky Road Brownies
What are Rocky Road Brownies exactly?
Rocky Road Brownies are a delightful dessert featuring a rich, fudgy chocolate brownie base, generously studded with mini marshmallows, crunchy nuts (like walnuts or pecans), and sometimes extra chocolate chips. The “Rocky Road” name comes from the classic ice cream flavor, which combines these same elements for a varied and exciting texture in every bite. They’re a favorite for their combination of chewy, gooey, and crunchy sensations.
Can I use different types of nuts or chocolate?
Absolutely! While walnuts are traditional, you can certainly customize your Rocky Road Brownies. Pecans are a fantastic alternative, offering a slightly different flavor profile. For chocolate, feel free to experiment with milk chocolate chips, dark chocolate chunks, or even white chocolate. Just remember that changing the type of chocolate or nut will subtly alter the overall taste and texture of your homemade treat.
How do I get a really gooey marshmallow topping?
To achieve that signature gooey marshmallow topping on your Rocky Road Brownies, I have a little trick! Instead of mixing all the marshmallows into the batter, save about half. During the last 5-7 minutes of baking, sprinkle those reserved marshmallows over the top of the brownies. Return them to the oven just until they’ puff up and get lightly golden. This method ensures they become beautifully melted and sticky without fully dissolving into the brownie.
Why are they called Rocky Road Brownies?
The name Rocky Road Brownies is directly inspired by the popular ice cream flavor, “Rocky Road.” This ice cream originated in the 1920s and was known for its mix-ins of chocolate, marshmallows, and nuts, creating a “rocky” texture. When these same elements are incorporated into a brownie, the name perfectly describes the bumpy, varied, and delicious texture you find in every square. It’s a nod to a classic American dessert combination.
Variations of Decadent Rocky Road Brownies You Can Try
While my classic recipe for Rocky Road Brownies is a favorite, I love to experiment! There are so many ways to customize these delightful treats to suit different tastes or dietary needs. You can easily transform them into new and exciting flavor experiences, always keeping that core combination of chocolate, marshmallow, and nuts.
- Nut-Free Version: For those with nut allergies, you can simply omit the walnuts. Instead, try adding pretzels for a salty crunch, or more chocolate chips.
- Spicy Kick: If you enjoy a little heat, add a pinch of cayenne pepper to the brownie batter. It creates a wonderful depth of flavor that complements the chocolate beautifully.
- Different Chocolate: Instead of semi-sweet, try milk chocolate for a sweeter profile or dark chocolate for a more intense, less sweet brownie. You could even mix in white chocolate chips to your Marshmallow chocolate nut brownies for extra color and flavor.
- No-Bake Option: For a quick fix, adapt the concept into a no-bake bar! Combine crushed cookies, melted butter, and cocoa for the base, then top with melted chocolate, marshmallows, and nuts. It’s a different texture, but still delivers that classic rocky road experience.

Rocky Road Brownies: 1 Secret for an Amazing Treat
- Total Time: 1 hour 25 minutes
- Yield: 16 brownies 1x
- Diet: Vegetarian
Description
Sink your teeth into the ultimate indulgence with these Rocky Road Brownies—perfect for a quick dessert, easy recipe lovers, and anyone who can’t resist a chocolate-marshmallow combo. With a crackly top, fudgy center, melty chocolate chips, gooey marshmallows, and crunchy walnuts, this is a brownie that satisfies every craving. Whether you’re looking for cozy baking ideas, easy dessert recipes, or crowd-pleasing party food ideas, these brownies are a top-tier choice for both casual and special occasions.
Ingredients
- 1 cup unsalted butter
- 1 cup granulated sugar
- 1/2 cup brown sugar
- 3 large eggs
- 1 teaspoon vanilla extract
- 3/4 cup all-purpose flour
- 1/2 cup unsweetened cocoa powder
- 1/2 teaspoon salt
- 1/2 teaspoon baking powder
- 1 cup semi-sweet chocolate chips
- 1 1/2 cups mini marshmallows
- 3/4 cup chopped walnuts (or pecans)
Instructions
- Preheat oven to 350°F (175°C) and line a 9×13 inch pan with parchment paper.
- Melt butter in a saucepan over low heat, then whisk in both sugars until smooth.
- Let mixture cool slightly, then add eggs one at a time, followed by vanilla extract.
- In a separate bowl, mix flour, cocoa powder, salt, and baking powder.
- Add dry ingredients to wet mixture and stir until just combined.
- Fold in most of the chocolate chips and chopped nuts.
- Gently fold in mini marshmallows without overmixing.
- Spread batter in prepared pan and sprinkle remaining chips and nuts on top.
- Bake for 30–35 minutes, or until toothpick comes out with moist crumbs.
- Cool completely in pan before lifting and slicing into squares.
Notes
- Let the melted butter mixture cool before adding eggs to avoid scrambling.
- Don’t overmix after adding dry ingredients for the fudgiest texture.
- For extra gooeyness, press a few marshmallows on top before baking.
- Prep Time: 20 minutes
- Cook Time: 35 minutes
- Category: Dessert
- Method: Baking
- Cuisine: American
Nutrition
- Serving Size: 1 brownie
- Calories: 280
- Sugar: 24g
- Sodium: 110mg
- Fat: 14g
- Saturated Fat: 7g
- Carbohydrates: 36g
- Fiber: 2g
- Protein: 3g
- Cholesterol: 40mg