Pita bread has always held a special place in my heart, reminding me of bustling Mediterranean markets and the warmth of family dinners. I remember my first trip to Greece, biting into a fresh piece of fluffy pita bread, still warm from the oven, and instantly falling in love. The aroma of yeast and flour, the slight chewiness, and that satisfying puff that creates the perfect pocket – it’s pure magic! This easy homemade pita bread recipe brings that authentic experience right into your kitchen. You’ll discover how simple it is to make this versatile flatbread, perfect for dipping into hummus or crafting delicious sandwiches. Let’s get cooking!
Why You’ll Love This Homemade Pita Bread
I promise, once you try making your own pita bread, you’ll never go back to store-bought! This recipe is a game-changer for so many reasons:
- Incredible Taste: Nothing beats the fresh, warm flavor and soft texture of homemade pita bread. It’s simply divine!
- Quick Prep Time: Despite sounding complicated, the active prep time for this flatbread is surprisingly short, making it perfect for a weeknight.
- Healthy & Wholesome: Made with simple ingredients, this is a much healthier alternative to many processed breads.
- Budget-Friendly: You can create a batch of delicious pita bread for a fraction of the cost of buying it at the store.
- Family-Friendly Fun: Kids love watching the dough puff up in the pan, and it’s a fantastic way to involve them in cooking.
- Versatile Use: Whether you need a pocket bread for sandwiches or a soft side for dips, this recipe delivers every time.
Ingredients for Homemade Pita Bread
For this easy homemade pita bread recipe, you’ll find that the pita bread ingredients list is short and sweet, using common pantry staples. I love that I usually have everything on hand to whip up a batch of this delicious flatbread!
- 1 ½ cups warm water – Around 105-115°F (40-46°C) is ideal for activating the yeast.
- 2 teaspoons sugar – This isn’t just for sweetness; it feeds the yeast and helps it become active.
- 2 ¼ teaspoons active dry yeast – This is the magic ingredient that gives our pita bread its characteristic puff and soft texture.
- 3 ½ cups all-purpose flour – I find this amount gives the perfect consistency for a pliable dough.
- 1 ½ teaspoons salt – Essential for flavor, it also helps control the yeast activity.
- 2 tablespoons olive oil – Adds richness, helps with the dough’s elasticity, and gives the finished pita bread a lovely subtle flavor.
How to Make Pita Bread at Home
Making your own pita bread is a truly rewarding experience, and I promise it’s simpler than you think! Follow these steps for an authentic pita bread recipe that will impress everyone.
- Step 1: First, in a medium-sized bowl, combine your warm water (make sure it’s around 110°F or 43°C – too hot will kill the yeast, too cold won’t activate it), sugar, and active dry yeast. Give it a gentle swirl and let it sit undisturbed for 5 to 10 minutes. You’ll know it’s ready when a foamy layer appears on the surface, indicating the yeast is alive and happy.
- Step 2: In a separate, large mixing bowl, whisk together the all-purpose flour and salt. Create a well in the center of the dry ingredients. Pour the activated yeast mixture and the olive oil into the well.
- Step 3: Using a wooden spoon or your hands, stir everything together until a shaggy, somewhat sticky dough forms. Don’t worry if it looks a bit messy at this stage; we’re just getting started on this easy homemade pita bread journey.
- Step 4: Turn the dough out onto a lightly floured surface. Knead the dough for 8 to 10 minutes. This is where you develop the gluten, which is crucial for that signature puff. The dough should become smooth, elastic, and spring back when gently poked.
- Step 5: Lightly oil a clean bowl, then transfer the kneaded dough to it, turning once to coat. Cover the bowl with plastic wrap or a clean kitchen towel. Let the dough rise in a warm spot for 1 to 1.5 hours, or until it has visibly doubled in size. This proofing time is essential for a light and airy pita bread.
- Step 6: Once risen, gently punch down the dough to release the air. Transfer it to your floured surface and divide it into 8 equal pieces. I like to use a kitchen scale for accuracy, but eyeballing it works too. Roll each piece into a smooth ball, then flatten it into a 6 to 7-inch round using a rolling pin.
- Step 7: Arrange the shaped dough rounds on a baking sheet, cover them lightly with a towel, and let them rest for another 15 to 20 minutes. This second rest is key for encouraging that beautiful pocket to form when you cook your pita bread.
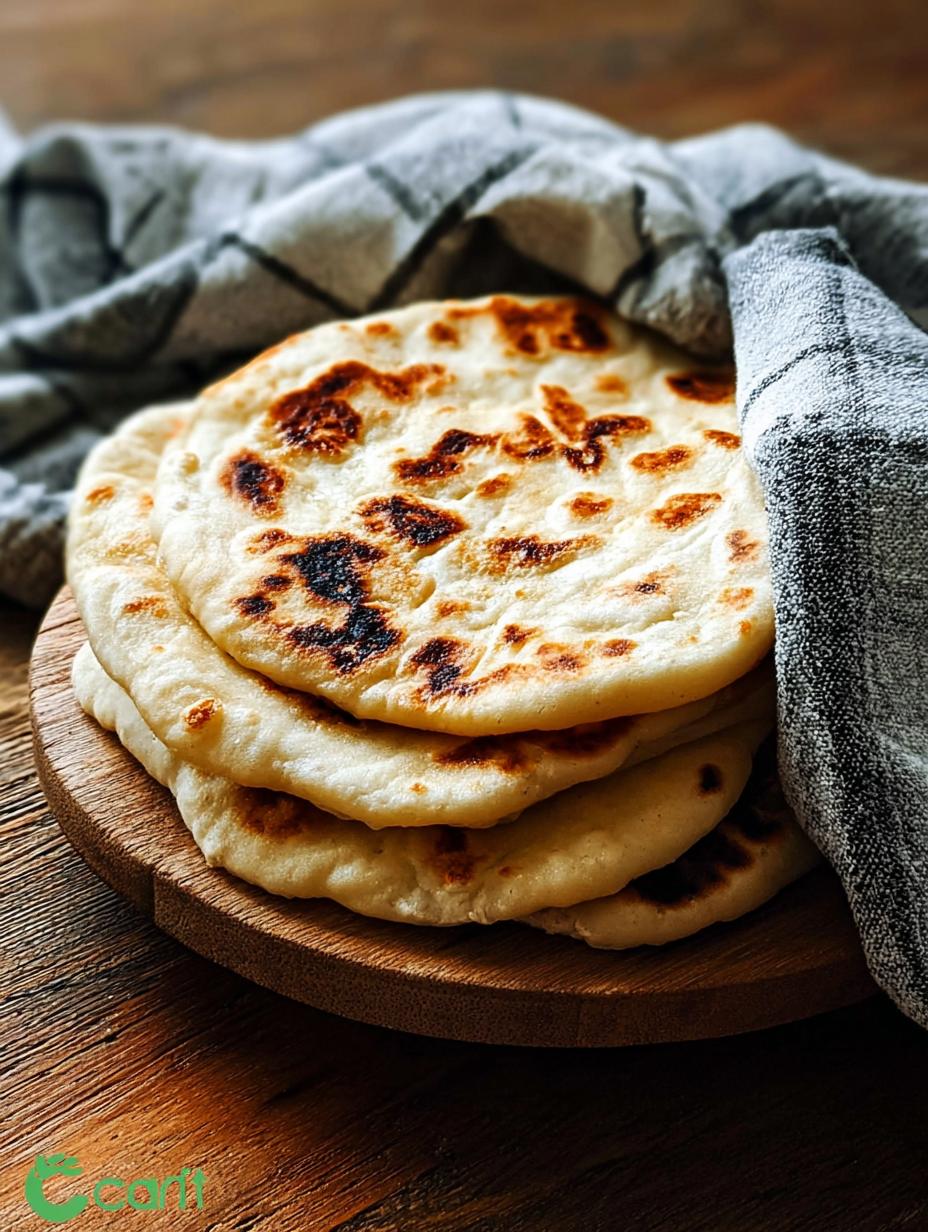
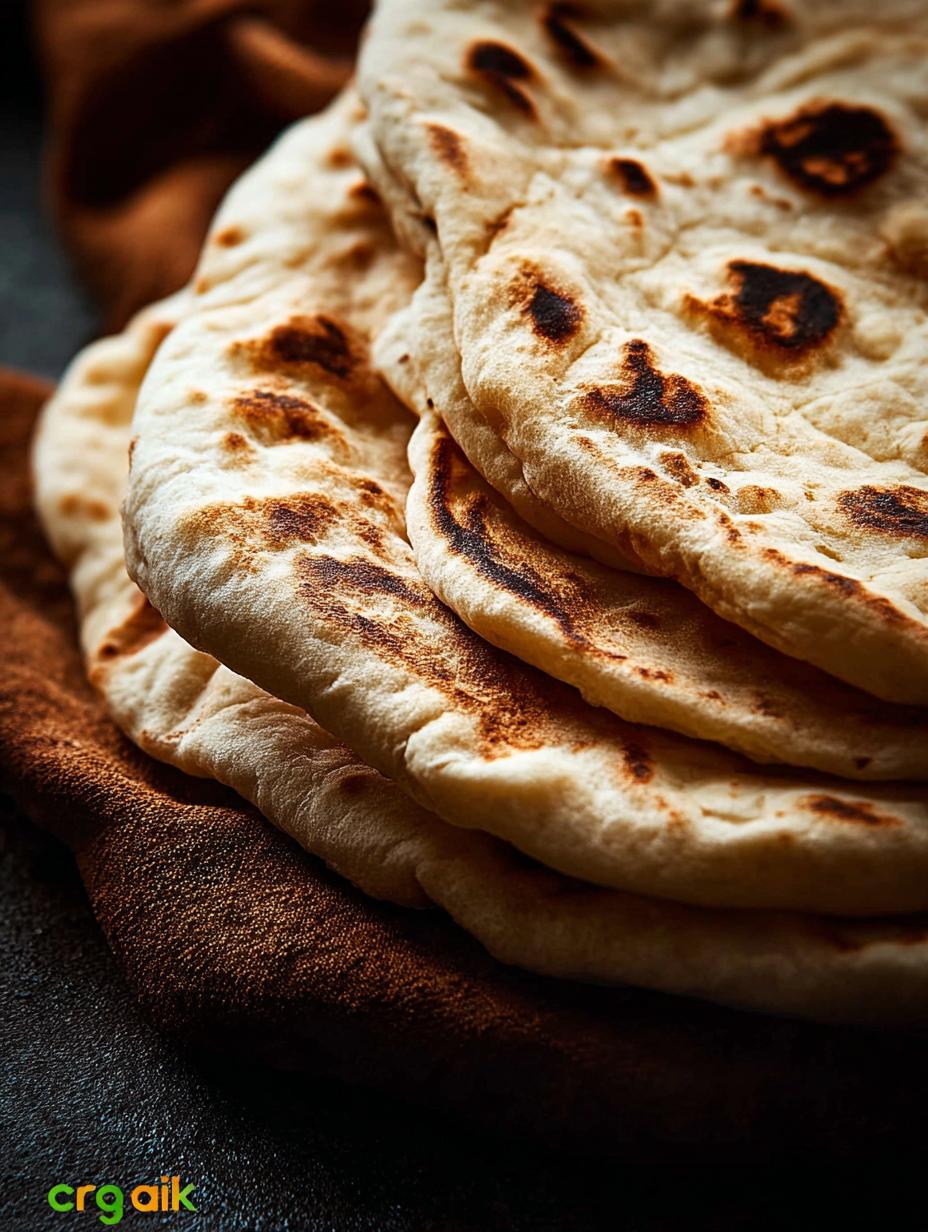
- Step 8: While the dough rests, heat a cast-iron skillet or heavy-bottomed pan over medium-high heat. You want it hot, but not smoking. Cook each pita bread round for 1 to 2 minutes per side. You’ll see it puff up like a balloon, and golden-brown spots will appear. This is the magic moment for your homemade pita bread!
- Step 9: As each pita bread cooks, transfer it to a clean kitchen towel. Wrap them loosely to keep them warm and soft until ready to serve. Enjoy your freshly baked pita bread!
Pro Tips for the Best Pita Bread
I’ve learned a few tricks over the years that will elevate your homemade pita bread from good to absolutely amazing. These pro tips ensure every batch is perfect and consistently delicious:
- Use Fresh Yeast: Always check the expiration date on your yeast. Old or inactive yeast is the most common reason for flat pita bread.
- Don’t Skip the Rest Times: The two rising periods are crucial. They allow the gluten to relax and the yeast to work its magic, which is key for that signature puff.
- Hot Pan is Key: Ensure your skillet is screaming hot before adding the dough. The sudden high heat creates steam inside the dough, forcing it to puff up into a beautiful pocket bread.
- Don’t Over-Flour: While kneading, resist the urge to add too much extra flour. A slightly tacky dough is better than a stiff one for soft pita bread.
- Cover Cooked Pitas: As soon as a pita bread comes off the heat, transfer it to a clean kitchen towel and cover it. This traps the steam, keeping them wonderfully soft and pliable.
What’s the secret to perfect puffy Pita Bread?
The real secret to achieving that beautiful puff in your pita bread lies in two things: proper kneading to develop gluten and cooking on a very hot surface. The high heat instantly turns the moisture inside the dough into steam, which inflates the bread to create that perfect pocket. This is why learning how to bake pita bread correctly on a hot pan is so important.
Can I make Pita Bread ahead of time?
Absolutely! You can prepare the dough for your pita bread up to the point of dividing and shaping. Store the shaped dough rounds, lightly floured and covered, in the refrigerator for up to 24 hours. Just let them come to room temperature for about 30 minutes before cooking. You can also cook them all and store the finished pita bread.
How do I avoid common mistakes with Homemade Pita Bread?
To ensure your pita bread turns out perfectly every time, avoid these pitfalls: don’t use cold water for yeast activation, as it won’t foam. Never overwork the dough during the final flattening, as this can tear the gluten and prevent puffing. Lastly, make sure your pan is hot enough; a lukewarm pan will result in flat, dense flatbread instead of a lovely pocket bread.

Best Ways to Serve Pita Bread
Once you have a stack of warm, fresh pita bread, the possibilities are endless! I love how versatile this Mediterranean bread is for any meal. Here are some of my favorite ways to enjoy it:
- Dipping Delight: My absolute favorite way to eat pita bread is torn into pieces and used to scoop up creamy hummus, baba ghanoush, or a vibrant tzatziki. The soft texture is perfect for soaking up all those delicious flavors.
- Pita Bread Sandwich Ideas: This is where pita bread truly shines as a pocket bread! Fill it with falafel, grilled chicken or lamb, fresh salads, or even scrambled eggs for a hearty breakfast wrap. It’s an ideal vehicle for a quick and satisfying meal.
- Homemade Pita Chips: For a crunchy snack, brush pita bread with olive oil, sprinkle with your favorite seasonings (like za’atar or garlic powder), cut into triangles, and bake until crispy. These are fantastic with any dip!
Nutrition Facts for Pita Bread
I know many of you are curious about the nutritional content of homemade pita bread, so I’ve broken it down for you. This easy homemade pita bread recipe yields about 8 servings, and here’s what you can expect per serving:
- Calories: 165 kcal
- Fat: 2.5g
- Saturated Fat: 0.5g
- Unsaturated Fat: 2g
- Trans Fat: 0g
- Carbohydrates: 32g
- Fiber: 1g
- Sugar: 0.5g
- Protein: 4.5g
- Sodium: 210mg
- Cholesterol: 0mg
Nutritional values are estimates and may vary based on specific ingredients used and preparation methods for your pita bread.
How to Store and Reheat Pita Bread
You’ve just made a delicious batch of homemade pita bread, and now you’re wondering how to keep it fresh. Proper storage is key to enjoying your soft flatbread for days! First, ensure your pita bread is completely cooled before storing it. Warm bread creates condensation, which can lead to sogginess.
For short-term storage, place the cooled pita bread in an airtight container or a resealable plastic bag. It will stay fresh and soft at room temperature for 2-3 days, or in the refrigerator for up to 3-4 days. This answers the question of how long does pita bread last when stored correctly.
If you’ve made a big batch or want to enjoy fresh pita bread later, you’ll be happy to know that can you freeze pita bread? Absolutely! Wrap individual pitas tightly in plastic wrap, then place them in a freezer-safe bag. They will keep well in the freezer for up to 3 months.
To reheat, simply thaw frozen pita bread at room temperature. Then, you can warm it gently in a dry skillet over medium heat for about 30 seconds per side, or briefly toast it for a few seconds. You can also pop it in a microwave for 10-15 seconds for a quick warm-up. This will bring back that wonderful fresh-baked texture.
Frequently Asked Questions About Pita Bread
Why is pita bread called pocket bread?
Pita bread is famously known as “pocket bread” because of the way it puffs up during baking or cooking. The high heat causes the water in the dough to turn into steam, which inflates the dough and separates the two layers, creating a hollow space or “pocket” inside. This unique characteristic makes it perfect for stuffing with various fillings, which is why it’s such a popular choice for sandwiches and wraps.
Is pita bread healthy?
Yes, homemade pita bread can be a very healthy choice, especially compared to some other breads. Made from simple ingredients like flour, water, yeast, and a little olive oil, it’s generally low in fat and calories. Whole wheat pita bread, in particular, offers more fiber and nutrients. It’s a great option for a balanced diet, providing complex carbohydrates for energy without excessive additives. However, like all foods, moderation is key.
Can I make homemade pita bread without yeast?
While traditional pita bread recipes rely on yeast for that signature puff and soft texture, you can certainly make a flatter version without it. Recipes for “no-yeast flatbread” often use baking powder or baking soda as a leavening agent. The result will be a delicious flatbread, but it won’t typically create the distinct pocket that yeast-leavened pita bread is famous for.
How long does fresh pita bread last?
Freshly baked homemade pita bread is best enjoyed the day it’s made for optimal softness and flavor. However, when stored properly in an airtight container or bag at room temperature, it will generally stay fresh for 2-3 days. If you refrigerate it, it can last for up to a week, though it might become slightly less soft. For longer storage, freezing is an excellent option to preserve its quality for up to 3 months.
Variations of Pita Bread You Can Try
Once you’ve mastered the basic homemade pita bread recipe, you might want to experiment with some exciting variations! I love how adaptable this Mediterranean bread is, allowing for different flavors and dietary needs. Here are a few ideas to inspire your next batch:
- Whole Wheat Pita: For a healthier, nuttier flavor, substitute half or all of the all-purpose flour with whole wheat flour. This variation of pita bread offers more fiber and a deeper taste, perfect for robust fillings.
- Herb and Garlic Pita: Before rolling out your dough, knead in a tablespoon of dried herbs like oregano or za’atar, and a teaspoon of garlic powder. This adds a fantastic aromatic twist to your basic pita bread.
- Homemade Pita Bread Without Yeast: If you’re short on time or don’t have yeast, you can create a flatter, chewier version using baking powder as a leavening agent. While it won’t puff into a pocket, it still makes a delicious flatbread.
- Grilled Pita: Instead of a skillet, cook your pita bread on a hot grill for a smoky flavor and beautiful char marks. This is especially delicious during summer cookouts!
Amazing Homemade Pita Bread: 1st Try Perfection!
- Total Time: 1 hour 50 minutes
- Yield: 8 pitas 1x
- Diet: Vegetarian
Description
Soft, warm, and beautifully puffed, this Homemade Pita Bread recipe is your go-to for a delicious, fresh-baked flatbread that’s better than store-bought. Perfect for wraps, dipping in hummus or tzatziki, or turning into crunchy pita chips, it’s a simple, quick bread made with pantry ingredients. Whether you’re looking for a quick breakfast idea, easy dinner bread, or a healthy snack, this easy recipe will have you coming back for more!
Ingredients
- 1 ½ cups warm water
- 2 teaspoons sugar
- 2 ¼ teaspoons active dry yeast
- 3 ½ cups all-purpose flour
- 1 ½ teaspoons salt
- 2 tablespoons olive oil
Instructions
- In a bowl, combine warm water (about 110°F), sugar, and active dry yeast. Let it sit for 5–10 minutes until foamy.
- In a large mixing bowl, mix the flour and salt. Add the yeast mixture and olive oil. Stir until a shaggy dough forms.
- Knead the dough on a floured surface for 8–10 minutes until smooth and elastic.
- Transfer to an oiled bowl, cover, and let it rise for 1 to 1.5 hours until doubled in size.
- Punch down the dough and divide it into 8 equal pieces. Roll each piece into a ball, then flatten into a 6–7 inch round.
- Cover and let the shaped dough rest for 15–20 minutes before cooking.
- Heat a skillet over medium-high heat. Cook each pita for 1–2 minutes per side until puffed and golden spots appear.
- Transfer cooked pitas to a clean towel to keep warm and soft. Serve fresh.
Notes
- Let the dough rest after rolling to encourage the perfect puff for your pita bread.
- Make sure your skillet is hot before cooking each pita.
- If the pita doesn’t puff, it’s still soft and delicious for wraps or dips.
- Prep Time: 1 hour 30 minutes
- Cook Time: 20 minutes
- Category: Bread
- Method: Stovetop
- Cuisine: Middle Eastern
Nutrition
- Serving Size: 1 pita
- Calories: 165 kcal
- Sugar: 0.5g
- Sodium: 210mg
- Fat: 2.5g
- Saturated Fat: 0.5g
- Unsaturated Fat: 2g
- Trans Fat: 0g
- Carbohydrates: 32g
- Fiber: 1g
- Protein: 4.5g
- Cholesterol: 0mg