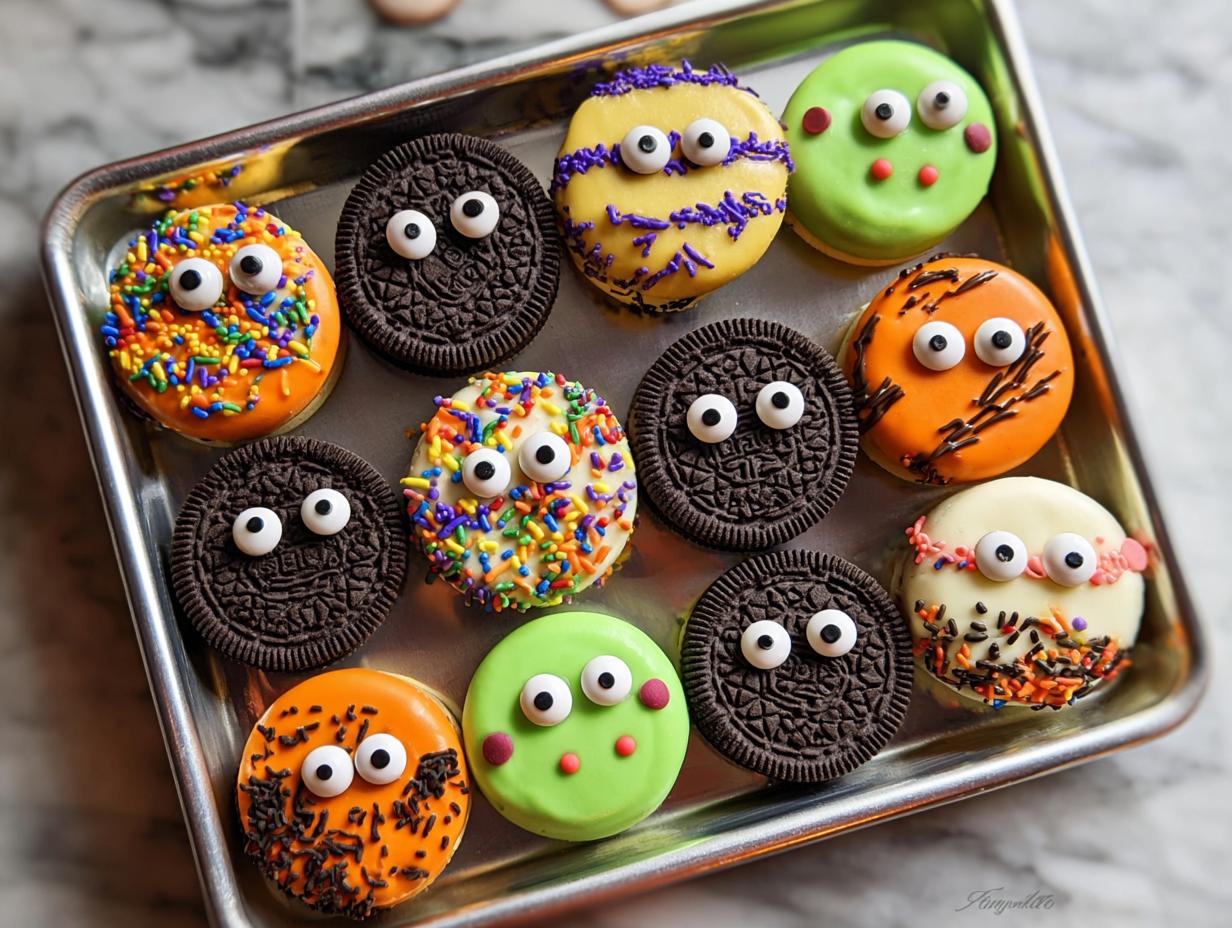
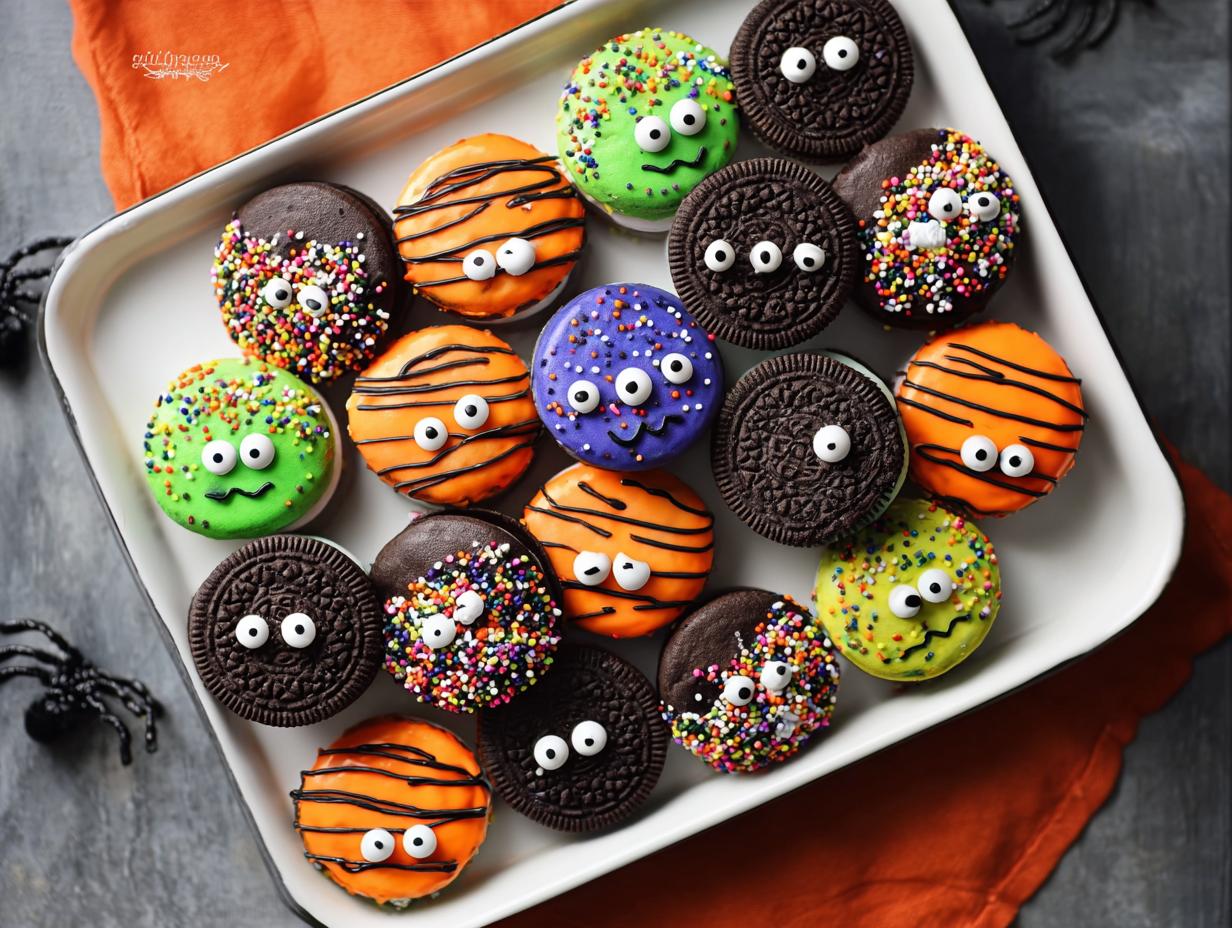
Chocolate Covered Halloween Oreos have become my absolute go-to treat for spooky season! Every year, I get this craving for something festive and fun, and these cookies hit the spot every single time. I remember my first attempt at making them; I was worried they’d be too messy or wouldn’t look spooky enough, but they turned out surprisingly well! The satisfying crunch of the Oreo followed by the smooth, sweet chocolate coating, especially when they’re decorated with little candy eyes or creepy sprinkles, is just pure joy. These Halloween Oreos dipped in chocolate are so simple to whip up, making them perfect for last-minute party prep or a fun afternoon activity. Let’s get these festive treats made!
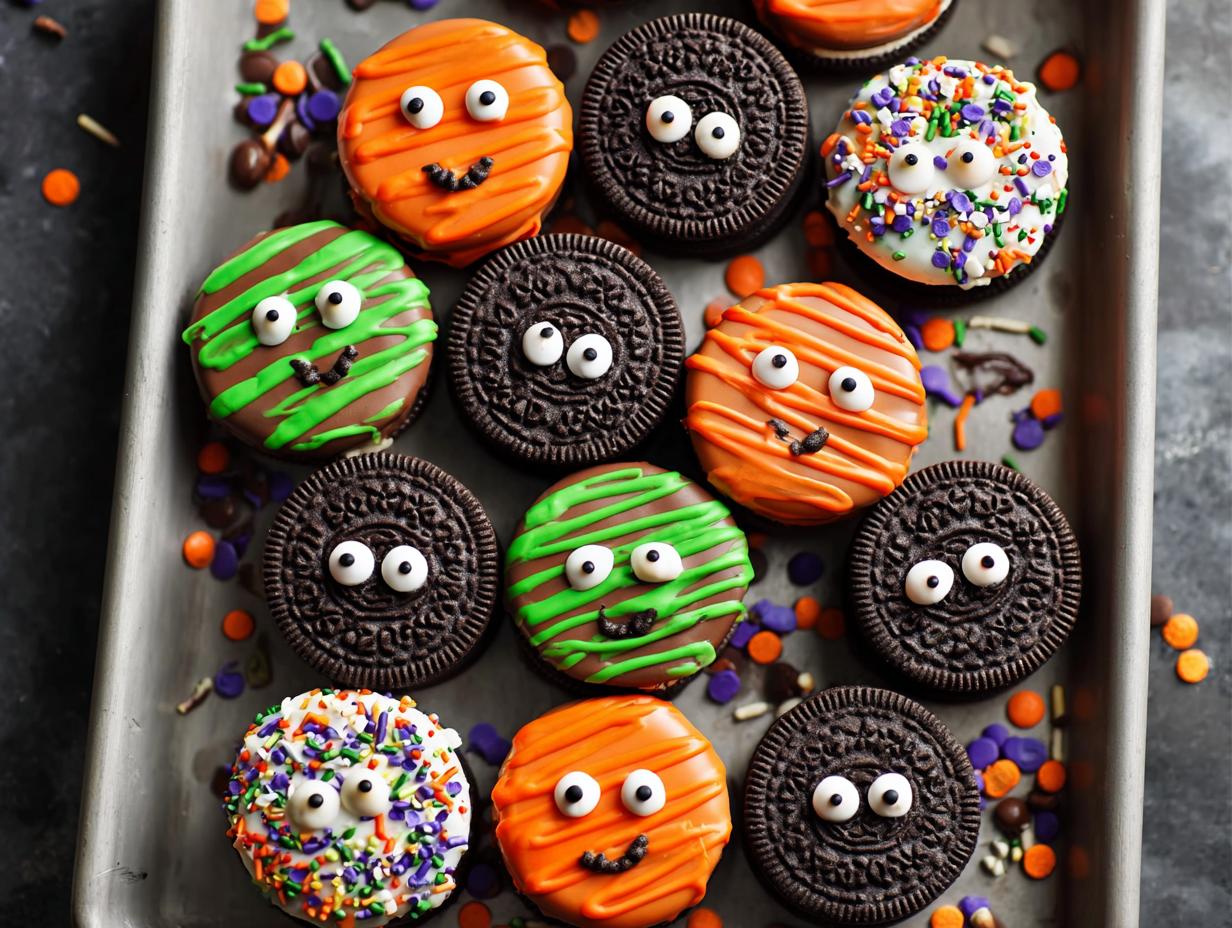
These Chocolate Covered Halloween Oreos are a total game-changer for your fall festivities! They’re incredibly simple to make, which means less stress for you and more fun. Plus, they look absolutely adorable and taste amazing, making them a guaranteed hit with everyone, from kids to adults.
- They are super quick to assemble, perfect for busy hosts.
- The combination of crunchy cookie and smooth chocolate is irresistible.
- They add a festive and spooky touch to any Halloween party table.
- These Easy Halloween chocolate covered Oreos are a fantastic activity for kids to help with.
- You can customize them endlessly with different colors and decorations.
- They’re a crowd-pleasing treat that’s always a favorite.
- These are truly the Easy Halloween chocolate covered Oreos you’ve been dreaming of.
- They make for fantastic edible party favors.
Ingredients for Your Spooky Chocolate Covered Oreos Recipe
Gathering your supplies for these Halloween decorated Oreos chocolate creations is super simple! You’ll need the classic base for our cookies, plus the magic coating that makes them festive. I always grab a little extra chocolate just in case!
- 1 package (14.3 oz) Original Oreos – the perfect crunchy base
- 2 cups (12 oz) chocolate candy melts (orange, black, purple, or green) – choose your favorite spooky hues for the Halloween decorated Oreos chocolate coating
- 1-2 tablespoons vegetable shortening (optional, for thinning chocolate) – this helps achieve a smooth, drizzle-able consistency if your melts are too thick
- Halloween-themed sprinkles – essential for adding that extra festive flair
- Candy eyes – for bringing your cookies to life with spooky faces
- Edible markers – to draw on little details like stitches or spooky smiles
Ready to dive in and create some amazing treats? Follow these simple steps to whip up your own batch of how to make chocolate covered Halloween Oreos. It’s a straightforward process that guarantees spooky and delicious results. I find that having everything prepped before I start melting the chocolate makes the whole experience much smoother, and you’ll end up with the best chocolate covered Halloween Oreos!
- Step 1: Prepare Your Baking Station
First things first, grab a couple of baking sheets and line them with parchment paper. This is crucial for preventing your cookies from sticking. While you’re at it, get your decorating supplies (sprinkles, candy eyes, edible markers) ready and within easy reach. Having everything laid out ensures a seamless decorating process for your Halloween themed chocolate Oreos. - Step 2: Melt the Chocolate
Now for the magic coating! Place your chosen colored candy melts into a microwave-safe bowl. Microwave on 50% power for 30-second intervals, stirring well after each, until completely smooth and melted. Alternatively, you can use a double boiler for gentle melting. If the chocolate seems a bit thick, stir in about a tablespoon of vegetable shortening to achieve a nice, flowing consistency. - Step 3: Dip and Coat the Oreos
Take an Oreo and carefully dip it into the melted chocolate, making sure to coat it entirely. I like to use a fork for this, gently turning the cookie to get full coverage. Lift the cookie with the fork and tap it gently against the side of the bowl to let any excess chocolate drip back in. This helps create a nice, even layer for your Halloween Oreos dipped in chocolate. - Step 4: Decorate Your Halloween Themed Chocolate Oreos
Before the chocolate coating sets, it’s time for the fun part! While the chocolate is still wet, press on candy eyes, sprinkle on festive Halloween sprinkles, or use edible markers to draw spooky faces, stitches, or cobwebs. This is where your creativity shines and turns simple cookies into festive Halloween chocolate cookie Oreos. - Step 5: Let Them Set
Place your beautifully decorated cookies onto the prepared parchment-lined baking sheets. Let your how to make chocolate covered Halloween Oreos sit at room temperature until the chocolate is completely firm, which usually takes about 30 minutes. If you’re in a hurry or your kitchen is warm, you can speed this up by popping them into the refrigerator for about 15-20 minutes.
Pro Tips for the Best Chocolate Dipped Halloween Cookies Oreos
Want to elevate your Halloween treats from good to absolutely spectacular? I’ve gathered a few insider tricks that make all the difference when creating these chocolate dipped Halloween cookies Oreos. These little bits of wisdom will help you achieve that professional, spooky look with ease!
- Always use good quality candy melts; they are formulated to set nicely and provide a smooth finish.
- Don’t rush the melting process – low and slow is key to preventing burnt chocolate.
- Work in a cool environment if possible, as warmer temperatures can make the chocolate melt too quickly.
- Have fun with your decorations! The more creative you get, the more unique your cookies will be.
What’s the secret to perfectly smooth chocolate coating?
The real secret to a perfectly smooth coating for your best chocolate for covering Oreos Halloween treats is patience and the right technique. Melt your candy melts slowly, either in the microwave on low power with frequent stirring or gently over a double boiler. Avoid overheating, which makes the chocolate seize. If it’s too thick, a tiny bit of vegetable shortening will smooth it out beautifully. For more tips on chocolate tempering, you can check out King Arthur Baking’s guide.
Can I make these DIY chocolate covered Halloween Oreos ahead of time?
Absolutely! These DIY chocolate covered Halloween Oreos are fantastic for making ahead. Once they’re completely set, store them in an airtight container at room temperature. They’ll stay fresh and delicious for up to a week, making your Halloween party prep much easier. You can find more information on food storage guidelines on the FoodSafety.gov website. Just make sure they aren’t stacked too high to avoid smudging the decorations.
How do I avoid common mistakes with chocolate covered Oreos Halloween?
A common pitfall with chocolate covered Oreos Halloween is uneven coating. Ensure you dip the entire cookie and let the excess drip off before placing it on the parchment paper. Another mistake is trying to decorate too soon; wait until the chocolate is slightly set but still pliable. This prevents smearing your designs and ensures a clean finish. For more baking tips, visit our homepage.
Creative Ways to Serve Festive Chocolate Oreos for Halloween
Once your delicious festive chocolate Oreos for Halloween are ready, it’s time to get creative with how you present them! These aren’t just cookies; they’re edible decorations that add a special touch to any Halloween gathering. I love arranging them on a tiered stand or in small treat bags tied with orange ribbon for a charming display.
For a spooky dessert table, consider placing them alongside cupcakes or a Halloween-themed cake. They also make a fantastic addition to a candy buffet or as a sweet ending to a Halloween dinner party. Imagine pairing these delightful Halloween party Oreos chocolate treats with a glass of cold milk or even a warm mug of apple cider – pure autumnal bliss!
Nutrition Facts for Chocolate Covered Halloween Oreos
Let’s talk about what goes into these delightful treats! When you’re making these chocolate covered Oreos Halloween cookies, knowing the approximate nutritional breakdown can be helpful. Remember, these are estimates, as the exact amounts can vary based on the type of chocolate candy melts and decorations you choose. For more details on nutritional information, you can refer to our about me page for context on our recipe development.
- Serving Size: 1 cookie
- Calories: Approximately 150-200
- Fat: Approximately 8-12g
- Saturated Fat: Approximately 4-6g
- Protein: Approximately 1-2g
- Carbohydrates: Approximately 20-25g
- Fiber: Less than 1g
- Sugar: Approximately 15-20g
- Sodium: Approximately 60-80mg
Nutritional values are estimates and may vary based on specific ingredients used.
How to Store and Reheat Simple Chocolate Covered Oreos Halloween
Keeping your delightful simple chocolate covered Oreos Halloween treats fresh is super easy! Once they’re completely cool and the chocolate has hardened, it’s time to think about storage. I always make sure mine are fully set before I even think about putting them away, to avoid any melty messes.
For short-term storage, place your Halloween themed chocolate Oreos in an airtight container at room temperature. They’ll stay perfectly delicious for about 3 to 4 days. If you need to keep them longer, you can absolutely freeze them! Wrap them well in plastic wrap, then in foil, and they’ll be good to go for up to 3 months. When you’re ready to enjoy them again, just let them thaw slowly in the refrigerator overnight. Reheating isn’t usually necessary for these cookies, but if you prefer them slightly warmer, a few seconds in a low oven or microwave can do the trick, though be careful not to melt the chocolate!
Frequently Asked Questions About Halloween Oreos Dipped in Chocolate
What are Halloween chocolate covered Oreos?
Simply put, what are Halloween chocolate covered Oreos? They’re classic Oreo cookies that have been dipped in melted chocolate candy melts and then decorated with spooky Halloween themes! Think orange, black, purple, or green coatings, adorned with sprinkles, candy eyes, or drawn-on faces. They’re a fun, edible way to celebrate the season. For more information on terms of use for recipes, please see our terms of use.
Why make chocolate covered Halloween Oreos?
There are so many reasons why make chocolate covered Halloween Oreos! They’re incredibly easy, making them a perfect DIY project for all ages. Plus, they look fantastic on a party table and taste amazing. They’re a guaranteed crowd-pleaser that adds a festive touch to any Halloween celebration, and they’re much more personal than store-bought treats. If you have any questions, feel free to contact us.
Can I use regular chocolate chips instead of candy melts?
You absolutely can! However, candy melts are often preferred for this type of project because they set up firmer and have a shinier finish without needing to be tempered. If you use chocolate chips, you might need to add a little shortening or oil to get the right consistency for dipping, and they might not set quite as hard.
How long do these cookies stay fresh?
These festive treats generally stay fresh for about 3-4 days when stored in an airtight container at room temperature. For longer storage, you can freeze them for up to 3 months. Just ensure they are completely cooled and the chocolate coating is firm before storing to prevent smudging or sticking. For privacy policy details, please review our privacy policy.
Variations of Chocolate Covered Halloween Oreos You Can Try
Ready to get even more creative with your treats? These creative chocolate covered Oreos Halloween ideas will help you customize your cookies for any taste or dietary need. Don’t be afraid to experiment and make them your own!
- Gluten-Free & Vegan Options: Swap out the Original Oreos for gluten-free or vegan versions available in most stores. Use dairy-free chocolate melts and vegan sprinkles for a fully inclusive treat that everyone can enjoy.
- White Chocolate Base: Instead of traditional candy melts, try using white chocolate candy melts as your base. You can then color this white chocolate with food-safe coloring gels to achieve vibrant Halloween shades or leave it a classic white for a ghostly effect.
- Flavor Infusions: Mix a tiny bit of peppermint extract or a drop of orange extract into your melted chocolate for a subtle flavor twist. This adds another layer of deliciousness to your Halloween themed chocolate Oreos.
- Drizzle Designs: After the base coating has set, use a contrasting color of melted chocolate in a piping bag or a Ziploc with a corner snipped off to create intricate drizzle patterns like spider webs or zigzags.

Amazing 1-Layer Chocolate Covered Halloween Oreos
- Total Time: 20 minutes
- Yield: Approximately 24 cookies 1x
- Diet: Vegetarian
Description
Create festive and spooky chocolate covered Halloween Oreos for your next party. This easy recipe yields adorable, crowd-pleasing treats perfect for Halloween.
Ingredients
- 1 package (14.3 oz) Original Oreos
- 2 cups (12 oz) chocolate candy melts (orange, black, purple, or green)
- 1–2 tablespoons vegetable shortening (optional, for thinning chocolate)
- Halloween-themed sprinkles
- Candy eyes
- Edible markers
Instructions
- Prepare your baking sheets by lining them with parchment paper.
- Melt the chocolate candy melts in a microwave-safe bowl according to package directions, stirring every 30 seconds until smooth. You can also melt them in a double boiler. If the chocolate is too thick, stir in a small amount of vegetable shortening.
- Dip each Oreo cookie into the melted chocolate, ensuring it is fully coated. Use a fork or a dipping tool to lift the cookie and allow excess chocolate to drip back into the bowl.
- Place the coated Oreo on the prepared baking sheet.
- While the chocolate is still wet, decorate your chocolate covered Halloween Oreos with sprinkles, candy eyes, or draw spooky faces with edible markers.
- Allow the chocolate covered Oreos Halloween cookies to set completely at room temperature or in the refrigerator for about 15-20 minutes.
- Store your spooky chocolate covered Oreos in an airtight container at room temperature.
Notes
- Use different colored candy melts for a variety of Halloween Oreos dipped in chocolate.
- Experiment with various Halloween sprinkles for unique decorations.
- Ensure the chocolate is fully set before stacking the cookies.
- These easy Halloween chocolate covered Oreos are best enjoyed within a week.
- Prep Time: 15 minutes
- Cook Time: 5 minutes
- Category: Desserts
- Method: Dipping and Decorating
- Cuisine: American
Nutrition
- Serving Size: 1 cookie
- Calories: Approximately 150-200 (varies based on chocolate and decorations)
- Sugar: Approximately 15-20g
- Sodium: Approximately 60-80mg
- Fat: Approximately 8-12g
- Saturated Fat: Approximately 4-6g
- Unsaturated Fat: Approximately 4-6g
- Trans Fat: 0g
- Carbohydrates: Approximately 20-25g
- Fiber: Less than 1g
- Protein: Approximately 1-2g
- Cholesterol: Approximately 0-5mg